지금까지 Test를 너무 등안시해왔다.
(안한건 아니었고,, 변명 해보자면 펌웨를 위주로 개발해서 마땅한 Test Framework이 없었다. 그래서 직접 cross architecture용 unit/통합 tester를 개발해서 test를 해오긴 했으나.. 이게 잘 알려진 test framework과는 사용법이 꽤나 달라서 보편적인 JUnit같은 framework을 이제 좀 사용해야겠다)
지금이라도 다시 시작해보자 ~.~
# 셋팅환경

+ Junit 4.13.2
+ google truth
+ Java (코틀린 귀찮..)
# Test용 Class 생성
Android Dependency가 있는 Context 등은 androidTest로 진행을 해야한다. 이번에는 그냥 java로만 이루어진 simple class를 test할 것이므로 간단히 class를 작성해본다.
|
1
2
3
4
5
|
public class Validator {
public boolean validateInput(int amount, String contents) {
return true;
}
}
|
cs |
Input에 대한 Validation을 확인하는 함수를 작성했다. (TDD를 가장한(?) 클래스라 그냥 return true를 넣어봤다..)
# Test 생성을 위한 Gradle Setting
아마 기본적으로 JUnit은 app level의 build.grandle에 들어있을 것이다.
추가적으로 google truth를 test에서 사용하기위해 dependencies의 testImplementation 항목으로 추가한다.
추 후 androidTest에서도 사용할 것 같으므로 androidTestImplementation에도 추가를 해준다.
| 참고. build.gradle(app module level)에서 dependency 항목들 implementation : 실제 code에서 사용할 의존성들(ex. appcompay, support lib...) testImplementation : 'test' 에서 사용될 의존성들 androidTestImplementation : 'androidTest' 에서 사용될 의존성들 |
|
1
2
3
4
5
6
7
8
9
10
11
12
13
14
15
|
dependencies {
implementation fileTree(dir: 'libs', include: ['*.jar'])
implementation 'com.android.support:appcompat-v7:+'
implementation 'com.android.support:design:28.+'
implementation 'com.android.support.constraint:constraint-layout:2.0.4'
testImplementation 'junit:junit:4.13.2'
testImplementation 'com.google.truth:truth:1.1.2'
androidTestImplementation 'androidx.test.ext:junit.1.1.2'
androidTestImplementation 'androidx.test.espresso:espresso-core:3.3.0'
androidTestImplementation 'com.google.truth:truth:1.1.2'
}
|
cs |
# Test Class 생성

위와 같이 Class 마우스 우클릭 -> Go To -> Test 를 누른다.
(Go To 대신 Generate를 눌러도 된다)
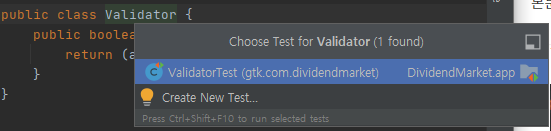
생성할 Class명을 선택한다.(Naming Rule에 맞춰서 자동 지정됨)
 |
 |
Testing Lib.을 JUnit4로 선택하고 Ok를 누른다. (다른 옵션은 나중에...)
Test Class를 생성할 Directory를 선택하라는 창이 나오면 'test'로 지정된 path를 선택한다. androidTest path는 현재 하고자하는 일반 test가 아닌 androidTest를 수행하고자 할 때 선택해야한다.
# 테스트 작성
|
1
2
3
4
5
6
7
8
9
10
11
12
13
14
15
16
17
18
19
20
21
22
23
24
25
26
27
28
29
|
import org.junit.Test;
import org.junit.runner.RunWith;
import org.junit.runners.JUnit4;
import static com.google.common.truth.Truth.assertThat;
@RunWith(JUnit4.class)
public class ValidatorTest {
@Test
public void whenInputIsValid() {
int amount = 100;
String contents = "test contetns";
Validator v = new Validator();
boolean result = v.validateInput(amount, contents);
assertThat(result).isEqualTo(true);
}
@Test
public void whenInputIsInvalid() {
int amount = 0;
String contents = "";
Validator v = new Validator();
boolean result = v.validateInput(amount, contents);
assertThat(result).isEqualTo(false); // google truth
}
}
|
cs |
먼저 class명 위에 @RunWith annotation을 JUnit4.class로 추가해준다.
그리고 작성하고자 하는 Test Method들에 @Test annotation을 붙여주고 Test를 작성하면 된다.
나는 위와 같이 input이 valid 일때와 invalid인 경우로 test를 작성하였다.
# Run

테스트는 위와 같이 함수 단위로 실행을 할 수도 있고

Class 단위로 진행할 수도 있다.
# 결과
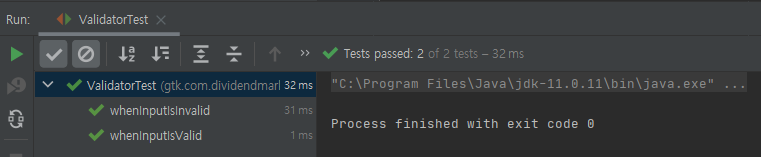
Test Run을 하면 빨간불이 돌다가 초록불로 뿅~ 하고 바뀐다. 'Tests passed 2' 를 확인하면 끝!
귀찮지만 테스트좀 열심히 해야지..
'소프트웨어 > Android/Java/Ndk' 카테고리의 다른 글
| Android12 변경사항 훑어보기 (0) | 2021.03.11 |
|---|---|
| Android] sms 읽기(문자 이벤트) (0) | 2016.06.14 |
| Android] BroadcastReceiver 등록 (0) | 2016.06.14 |
| android] WebView 안멈춤 현상, WebView 계속 소리남 (0) | 2016.02.18 |
| android] WindowManager UpdateViewLayout이 벌벌벌 떨릴때 (0) | 2016.02.18 |
| android] chat head (0) | 2016.02.13 |
| android] YouTubePlayer 객체가 파괴되는듯하다.. (0) | 2016.02.11 |